
High shelves
Bins + seasonal storage above the rod.
4224 Oregon Pike
Brownstown, PA 17508
Most “messy closet” problems happen because dead space goes unused. Use this 8-step flow to declutter fast, map your wardrobe needs, and turn corners, doors, floors, and high shelves into clean, intentional storage.
Bins + seasonal storage above the rod.
Hooks/racks for belts, scarves, hats.
Corner shelves/rods make awkward spaces useful.
Shoe racks, baskets, carts — no more “dumping ground.”
Best shortcut: measure first, then choose a system that matches your wardrobe (not the other way around).
Request a QuoteClosets are one of those make-or-break spaces in a home. When they’re organized, they simplify your day and inspire you to try new outfits and love the clothes you own.
When they’re cluttered and messy, the opposite is true. Finding what you need becomes a hassle, and getting dressed starts to feel like a chore.
One of the most common reasons closets get chaotic is that valuable “dead space” goes unused. Corners, high shelves, the backs of doors, and even the floor hold tons of storage potential that often gets overlooked.
Let’s walk through eight steps for how to use the dead space in your closet. That way, you can maximize organization, reduce stress, and make room for a wardrobe that truly works for you.
While you may be tempted to start by shopping for closet organizing solutions or color coding, the first step in learning how to organize a closet is to sort through what you already have. This will help you get a better idea of your current wardrobe as well as how many of the items you actually wear.
Before you can organize your closet (or make any decisions about where to add storage), you’ll need to start with a clean slate. That means pulling everything out (yes, everything) and laying it on your bed or another clean surface.
Once the closet is empty, give it a quick reset: dust shelves, wipe down rods, vacuum the floor, and freshen the space with a diffuser or air spray if you’d like.
Now comes the sorting. Create simple piles to declutter your closet without getting overwhelmed:
Take a deep breath, because the hardest part is over! Decluttering before overhauling your closet organization reduces decision fatigue later and makes it easier to see what you actually own. When you’re done, you’ll be left with a blank canvas ready for smarter storage solutions.
Once your wardrobe is pared down, take a moment to understand what you’re working with. Begin with a simple wardrobe inventory of all the clothes that ended up in your “keep” pile:
These details matter when you’re planning your closet layout, as they’ll help you better understand what kind of storage solutions you may need to maximize closet space.

This next step is where you’ll start to identify dead space (the underused areas that can help you maximize closet space without adding square footage). Take a closer look at the physical layout of your closet and ask yourself how you can better utilize it:
Next, grab a tape measure and jot down your closet’s width, depth, and height. Note the door swing, trim, and any vents or obstructions. When you know your measurements, you avoid buying storage that won’t fit or won’t work.
Use this as a quick “what goes where” guide.
Above the rod
Add a shelf, cubbies, or labeled bins for seasonal + seldom-used items.
Best for: seasonalSecond hanging area
Install a lower rod for shirts/skirts to instantly double hanging capacity.
Best for: short-hangBack of the door
Over-door hooks/racks for belts, scarves, hats, jewelry, small bags.
Best for: accessoriesCorners + narrow gaps
Corner shelves/rods or floating shelves turn awkward areas into storage.
Best for: folded itemsFloor zone
Shoe racks, baskets, rolling carts, or large bins keep things off the ground.
Best for: shoesHidden / pull-out storage
Pull-out belt racks, drawers, jewelry trays reduce clutter without adding bulk.
Best for: small itemsLighting upgrades
Motion LEDs make it easier to find items and keep the space intentional.
Best for: visibilityLaundry + hampers
Built-in hamper zones prevent piles and keep the closet “resettable.”
Best for: daily flowLuggage / rarely used items
Top shelf bins or dedicated cubbies keep bulky items contained.
Best for: bulkNow that you’ve identified where the gaps are, it’s time to put your closet space to work. There are dozens of clever ways to use dead space in your closet, and the right combination can completely change how your closet feels and functions. Here are a few ideas to try.
Quick, high-impact upgrades you can mix and match.
If you can make better use of the area above your hanging rod, add an extra shelf, install vertical cubbies, or use stackable clear boxes to keep seasonal items and accessories off the floor and out of your way while still being easy to access.
If you mostly hang shirts, skirts, or kids’ clothes, consider installing a second rod below the first. This instantly doubles your usable space without requiring a bigger closet.
The back of your closet door is prime real estate. Over-the-door racks, hooks, or even pegboards can hold items that tend to get lost in drawers, such as belts, scarves, jewelry, small bags, or hats.
Corners can be tricky, but they don’t have to be wasted. Corner rods, rotating hangers, or floating corner shelves can make these awkward spaces surprisingly functional.
Instead of letting your closet floor become a dumping zone, add structure. Shoe racks, rolling carts, or large storage bins help keep items easy to reach but neatly out of the way.
Those tiny slices of space at the ends of closets are perfect for custom or DIY shelving. Float a few shelves and suddenly that “dead” area becomes another area for ample storage.
Pull-out racks for belts or ties, sliding drawers, jewelry trays, and even hidden safes maximize space without adding clutter.
Good lighting changes everything (and can make it easier to locate all your belongings). Motion-sensor strips, LEDs, or upgraded fixtures make it easier to see what’s in your closet and create a space that feels intentional.
At some point, even the best DIY organizing tricks can only go so far. You don’t have to buy a bunch of disparate organizing solutions and hope they will all somehow work together.
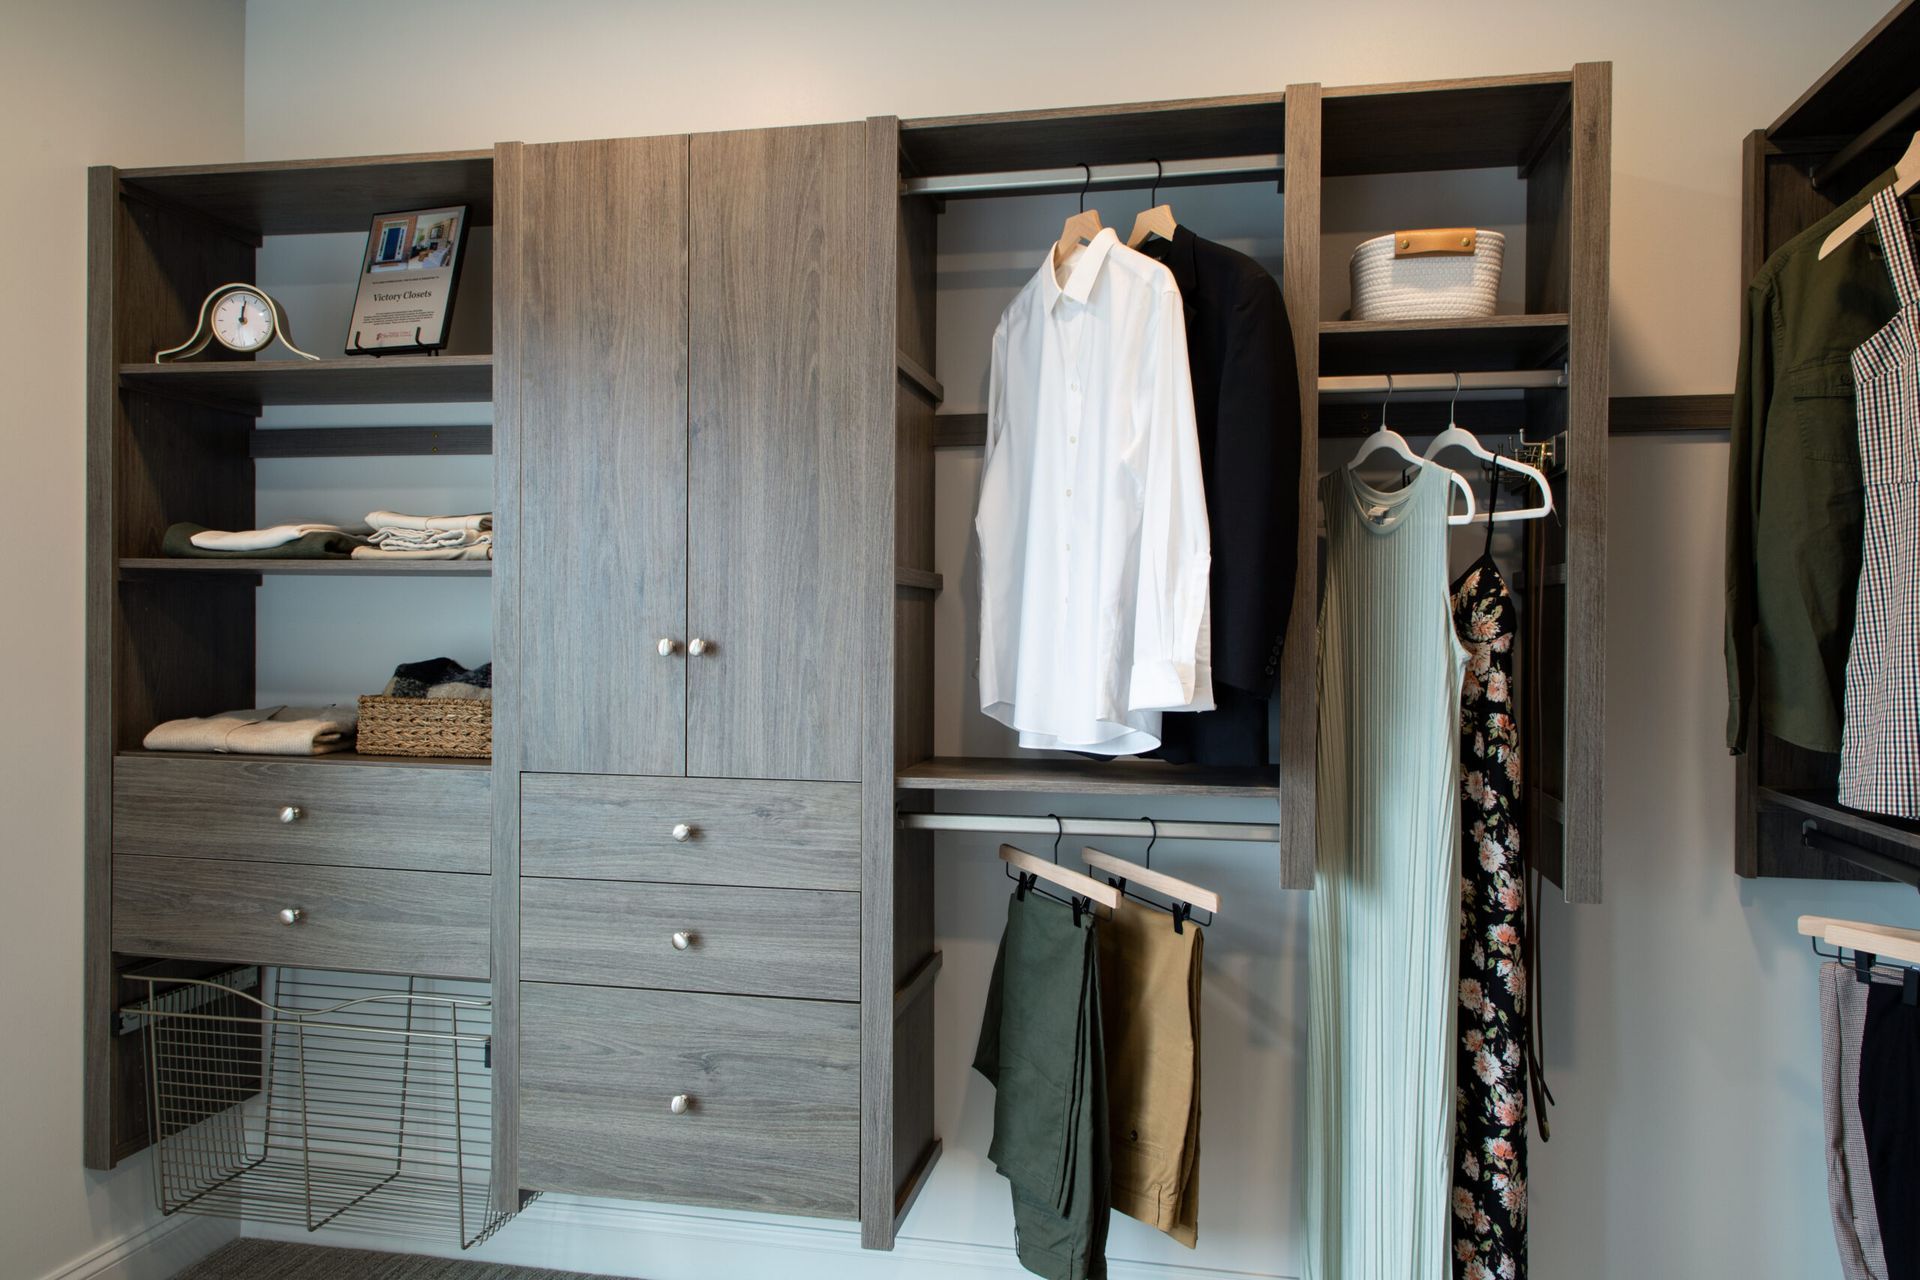
We’re all aware that most builder-grade closets include a single rod and shelf, which means a lot of dead space goes untouched. But a modular closet system, like Victory Closets, can change that. Without one, you’ll likely end up with piles of extra clothes, overstuffed drawers and shelves, and wrinkled or damaged clothing.
When investing in a modular closet system, look for an option that includes:
With a modular system like Victory Closets, you’ll be able to choose the closet storage solutions that are most relevant to your wardrobe. You’ll also have the ability to adjust your closet seasonally or whenever your needs change. And, unlike many store-bought options, custom closet systems can be easily updated as your wardrobe evolves without any tools or difficult labor.
You’ll also be able to choose the style, color, and finish of your closet system to match the rest of your master suite or home. If you’re not sure where to get started, some companies will even send out an expert for a free in-home consultation.
As you prepare for the installation of your custom closet system, take a look at your empty closet space and consider any updates you may want to make. In addition to a place to store your clothes, your closet should be an inspiring place you look forward to visiting each morning.
We’ve seen several transformative finishing touches over the years, including:
Adding these finishing touches will make your closet an exciting escape from the monotony of getting dressed each morning and will encourage you to keep the space tidy and clean. And, if you find yourself dreaming of a larger
renovation for your closet, a
home remodel company like KBE Design Build can help plan and execute your vision.
Once your closet storage solution is installed and you’ve added your finishing touches, you can return your clothes to their new organizational system. Before you do so, consider how you’d like your clothing to be grouped. There are many ways to organize clothes in your closet, and there is no right or wrong answer, as long as the solution serves you.
Here are some of the organization groupings we’ve seen over the year:
If you live in an area with highly variable weather, organizing by warmth or season might make the most sense. If you dress formally at work but casually at home, organizing by purpose might be best. Whichever organizational system you choose, it should make getting dressed each day simple and enjoyable.
Once you’ve learned how to organize a closet and built your perfect wardrobe, you’ll want to keep it tidy and clean! In addition to dusting and vacuuming regularly, you’ll also want to reassess your wardrobe at the end of every season. While you don’t need to do a complete overhaul, a quick look through your closet can help you remove unworn pieces and create a shopping list to fill any gaps in your wardrobe.
If you opt for a modular closet system, you’ll also be able to reconfigure your space each season to best fit your wardrobe. For example, you can make more room for long dresses in the summer or add shelving to house extra sweaters and knits in the winter. Many custom closet systems don’t even require tools, making these seasonal updates even easier to accomplish.
Learning how to maximize closet space requires us to focus on how we can make everyday routines easier and more enjoyable (and then finding storage solutions and systems to make that reality). When dead space in your closet is put to work, your wardrobe feels more functional and far less frustrating.
Whether you’re making small updates or considering a full custom closet system,
thoughtful design makes all the difference.

Uncover the possibilities we offer for you and your living space. We are eager to discuss your project vision and determine if we are the perfect match for bringing it to life!

Click or scan this QR code with your phone to leave us a Google review!
Website & Hosting by RedX Web Design. Built with SovoWeb CMS.